教程:使用 Label Studio 的 machine learning backend 进行辅助标注和训练
本教程在 基于 UIE 的命名实体识别 的基础上,进一步通过集成 Label Studio 的 Machine Learning Backend 实现交互式预注释和模型训练等功能。
环境准备
-
在 OpenBayes 启动一个「模型训练」的容器,环境选择
paddlepaddle-2.3资源选择vgpu或其他 GPU 容器 -
在 Jupyter 中打开一个 Terminal 窗口,然后执行命令
openbayes-label-studio启动label-studio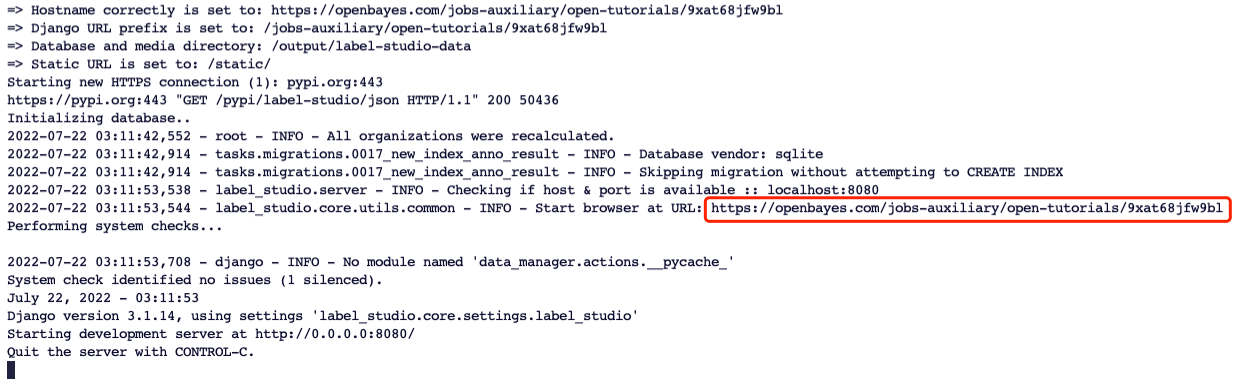
在浏览器中打开红框中的链接,注册账户并登录
-
打开另外一个 Terminal 窗口执行如下命令,安装
label_studio_mlpip install label_studio_ml
pip uninstall attr
Machine Learning Backend 编写
完整的 Machine Learning Backend 见 my_ml_backend.py 文件。更多有关自定义机器学习后端编写的内容可参考 Write your own ML backend。
简单来讲,my_ml_backend.py 内主要包含一个继承自 LabelStudioMLBase 的类,其内容可以分为以下三个主要部分:
__init__方法,包含模型的加载和基本配置的初始化predict方法,用于为标注数据生成新的预测结果,其关键参数tasks就是 label studio 传递的原始数据fit方法,用于模型的训练,当点击页面上的Train按钮时,会调用此方法(具体的位置在下文会提到),其关键参数annotations就是 label studio 传递的已经标注了的数据
__init__ 初始化方法
在 __init__ 方法中定义和初始化需要的变量。LabelStudioMLBase 类提供了以下几个可供使用的特殊变量:
- self.label_config: 原始标签配置。
- self.parsed_label_config: 为项目提供结构化的 Label Studio 标签配置。
- self.train_output: 包含之前模型训练运行的结果,与训练调用部分中定义的
fit()方法的输出相同。
如本教程的例子中,标签配置为:
<View>
  <Labels name="label" toName="text">
  <Label value="地名" background="#FFA39E"/>
  <Label value="人名" background="#D4380D"/>
  <Label value="组织" background="#FFC069"/>
  <Label value="时间" background="#AD8B00"/>
  <Label value="产品" background="#D3F261"/>
  <Label value="价格" background="#389E0D"/>
  <Label value="天气" background="#5CDBD3"/>
  </Labels>
  <Text name="text" value="$text"/>
</View>
相对应的 parsed_label_config 如下所示:
{
	'label': {
		'type': 'Labels',
		'to_name': ['text'],
		'inputs': [{
			'type': 'Text',
			'value': 'text'
		}],
		'labels': ['地名', '人名', '组织', '时间', '产品', '价格', '天气'],
		'labels_attrs': {
			'地名': {
				'value': '地名',
				'background': '#FFA39E'
			},
			'人名': {
				'value': '人名',
				'background': '#D4380D'
			},
			'组织': {
				'value': '组织',
				'background': '#FFC069'
			},
			'时间': {
				'value': '时间',
				'background': '#AD8B00'
			},
			'产品': {
				'value': '产品',
				'background': '#D3F261'
			},
			'价格': {
				'value': '价格',
				'background': '#389E0D'
			},
			'天气': {
				'value': '天气',
				'background': '#5CDBD3'
			}
		}
	}
}
根据需要从 self.parsed_label_config 变量中提取需要的信息,并通过 PaddleNLP 的 Taskflow 加载用于预标注的模型。
def __init__(self, **kwargs):
    # don't forget to initialize base class...
    super(MyModel, self).__init__(**kwargs)

    # print("parsed_label_config:", self.parsed_label_config)
    self.from_name, self.info = list(self.parsed_label_config.items())[0]

    assert self.info['type'] == 'Labels'
    assert self.info['inputs'][0]['type'] == 'Text'

    self.to_name = self.info['to_name'][0]
    self.value = self.info['inputs'][0]['value']
    self.labels = list(self.info['labels'])
    # init uie model
    self.model = Taskflow("information_extraction", schema=self.labels, task_path= './checkpoint/model_best')
predict 预测方法
编写代码覆盖 predict(tasks, **kwargs) 方法。predict() 方法接受 JSON 格式的 Label Studio 任务 并以 Label Studio 接受的格式 返回预测。此外,还可以包含和自定义可用于主动学习循环的预测分数。
tasks 参数包含了有关要进行预注释的任务的详细信息。具体的 task 格式如下所示:
{
	'id': 16,
	'data': {
		'text': '新华社都柏林 6 月 28 日电(记者张琪)第二届“汉语桥”世界小学生中文秀爱尔兰赛区比赛结果日前揭晓,来自都柏林市的小学五年级学生埃拉·戈尔曼获得一等奖。'
	},
	'meta': {},
	'created_at': '2022-07-12T07:05:06.793411Z',
	'updated_at': '2022-07-12T07:05:06.793424Z',
	'is_labeled': False,
	'overlap': 1,
	'inner_id': 6,
	'total_annotations': 0,
	'cancelled_annotations': 0,
	'total_predictions': 0,
	'project': 2,
	'updated_by': None,
	'file_upload': 2,
	'annotations': [],
	'predictions': []
}
具体的格式可以在 label studio 的数据列表里点击「show task source」查看:

通过 Taskflow 进行预测需要从 ['data']['text'] 字段提取出原始文本,返回的 uie 预测结果格式如下所示:
{
	'地名': [{
		'text': '爱尔兰',
		'start': 34,
		'end': 37,
		'probability': 0.9999107139090313
	}, {
		'text': '都柏林市',
		'start': 50,
		'end': 54,
		'probability': 0.9997840536235998
	}, {
		'text': '都柏林',
		'start': 3,
		'end': 6,
		'probability': 0.9999684097596173
	}],
	'人名': [{
		'text': '埃拉·戈尔曼',
		'start': 62,
		'end': 68,
		'probability': 0.9999879598978225
	}, {
		'text': '张琪',
		'start': 15,
		'end': 17,
		'probability': 0.9999905824882092
	}],
	'组织': [{
		'text': '新华社',
		'start': 0,
		'end': 3,
		'probability': 0.999975681447097
	}],
	'时间': [{
		'text': '6 月 28 日',
		'start': 6,
		'end': 11,
		'probability': 0.9997071721989244
	}, {
		'text': '日前',
		'start': 43,
		'end': 45,
		'probability': 0.9999804497706464
	}]
}
从 uie 预测结果中提取相应的字段,构成 Label Studio 接受的预注释格式。命名实体识别任务的具体预注释示例可参考 Import span pre-annotations for text。
更多其他类型任务的具体预注释示例可参考 Specific examples for pre-annotations。
def predict(self, tasks, **kwargs):
    from_name = self.from_name
    to_name = self.to_name
    model = self.model

    predictions = []
    # loop every task
    for task in tasks:
        # print("predict task:", task)
        text = task['data'][self.value]
        uie = model(text)[0]
        # print("uie:", uie)

        result = []
        scores = []
        for key in uie:
            for item in uie[key]:
                result.append({
                    'from_name': from_name,
                    'to_name': to_name,
                    'type': 'labels',
                    'value': {
                        'start': item['start'],
                        'end': item['end'],
                        'score': item['probability'],
                        'text': item['text'],
                        'labels': [key]
                    }
                })
                scores.append(item['probability'])
        result = sorted(result, key=lambda k: k["value"]["start"])
        mean_score = np.mean(scores) if len(scores) > 0 else 0

        predictions.append({
            'result': result,
            # optionally you can include prediction scores that you can use to sort the tasks and do active learning
            'score': float(mean_score),
            'model_version': 'uie-ner'
        })
    return predictions
fit 训练方法
基于新注释更新模型。
编写代码覆盖 fit() 方法。fit() 方法接受 JSON 格式的 Label Studio 注释 并返回任意一个可以存储模型相关信息的 JSON 字典。
def fit(self, annotations, workdir=None, **kwargs):
    """ This is where training happens: train your model given list of annotations,
        then returns dict with created links and resources
    """
    # print("annotations:", annotations)
    dataset = convert(annotations)

    with open("./doccano_ext.jsonl", "w", encoding="utf-8") as outfile:
        for item in dataset:
            outline = json.dumps(item, ensure_ascii=False)
            outfile.write(outline + "\n")

    os.system('python doccano.py \
        --doccano_file ./doccano_ext.jsonl \
        --task_type "ext" \
        --save_dir ./data \
        --splits 0.5 0.5 0')

    os.system('python finetune.py \
        --train_path "./data/train.txt" \
        --dev_path "./data/dev.txt" \
        --save_dir "./checkpoint" \
        --learning_rate 1e-6 \
        --batch_size 4 \
        --max_seq_len 512 \
        --num_epochs 20 \
        --model "uie-base" \
        --init_from_ckpt "./checkpoint/model_best/model_state.pdparams" \
        --seed 1000 \
        --logging_steps 10 \
        --valid_steps 100 \
        --device "gpu"')

    return {
        'path': workdir
    }
Machine Learning 集成
启动 Machine Learning Backend
在终端中依次执行下列命令:
# 初始化自定义机器学习后端
label-studio-ml init <my_ml_backend> --script <my_ml_backend.py>

# 开启机器学习后端服务
label-studio-ml start <my_ml_backend>
成功启动后,在终端中可以看到 ML 后端的 URL。

注意: 对于不同的 OpenBayes 算力容器,红框中的外部访问链接各不相同,直接使用本教程中的链接是无效的,需用终端中提示的链接进行替换。也可以使用
localhost替换其中的 IP 地址。
添加 ML Backend 到 Label Studio
在启动自定义机器学习后端之后,就可以将其添加到 Label Studio 项目中。
具体步骤如下:
- 点击 Settings - Machine Learning - Add Model
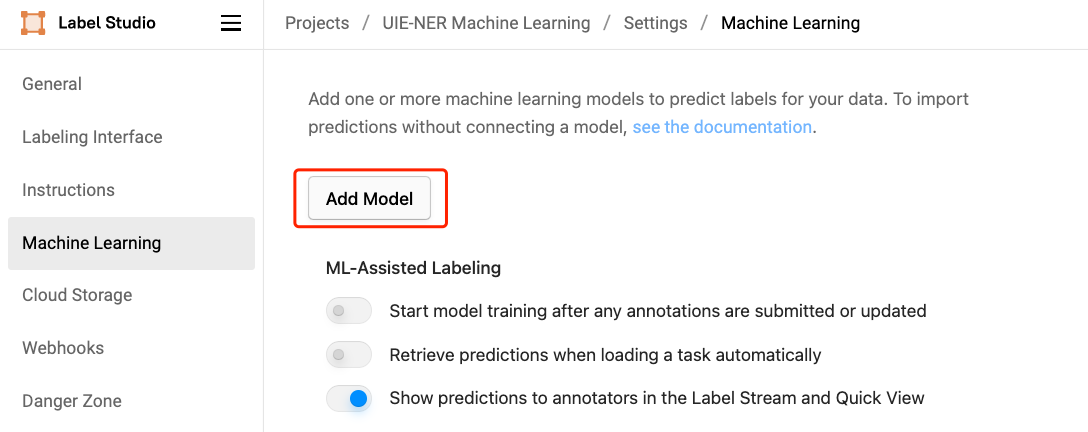
- 填入标题、ML 后端的 URL、描述(可选)等内容
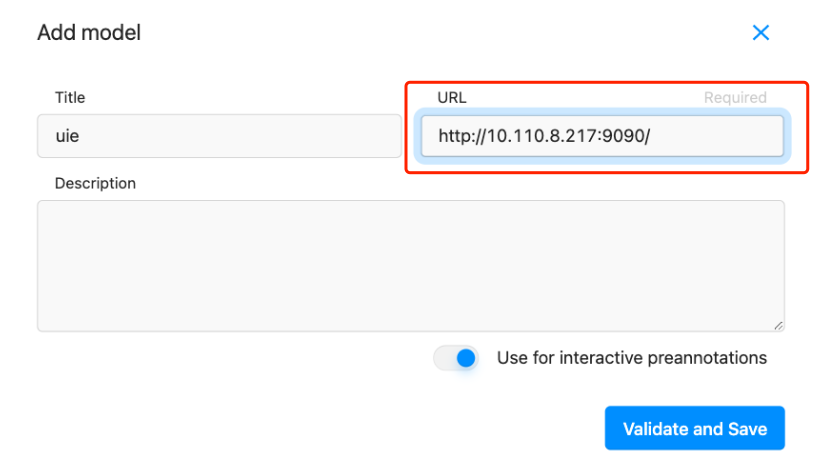
- 选择 Use for interactive preannotations 打开交互式预注释功能(可选)
- 点击 Validate and Save
如果出现报错,可查看 机器学习疑难解答。 除了通过 Label Studio 的 UI 界面添加 ML 后端以外,还可以 使用 API 添加 ML �后端。
获取交互式预注释
若要使用交互式预注释功能,需在添加 ML Backend 时打开 Use for interactive preannotations 选项。如未打开,可点击 Edit 进行编辑。 然后随便点击一个数据,label studio 就会悄悄运行刚才的 ml backend 生成新的标注了。

查看预标注好的数据,如有必要,对标注进行修改。
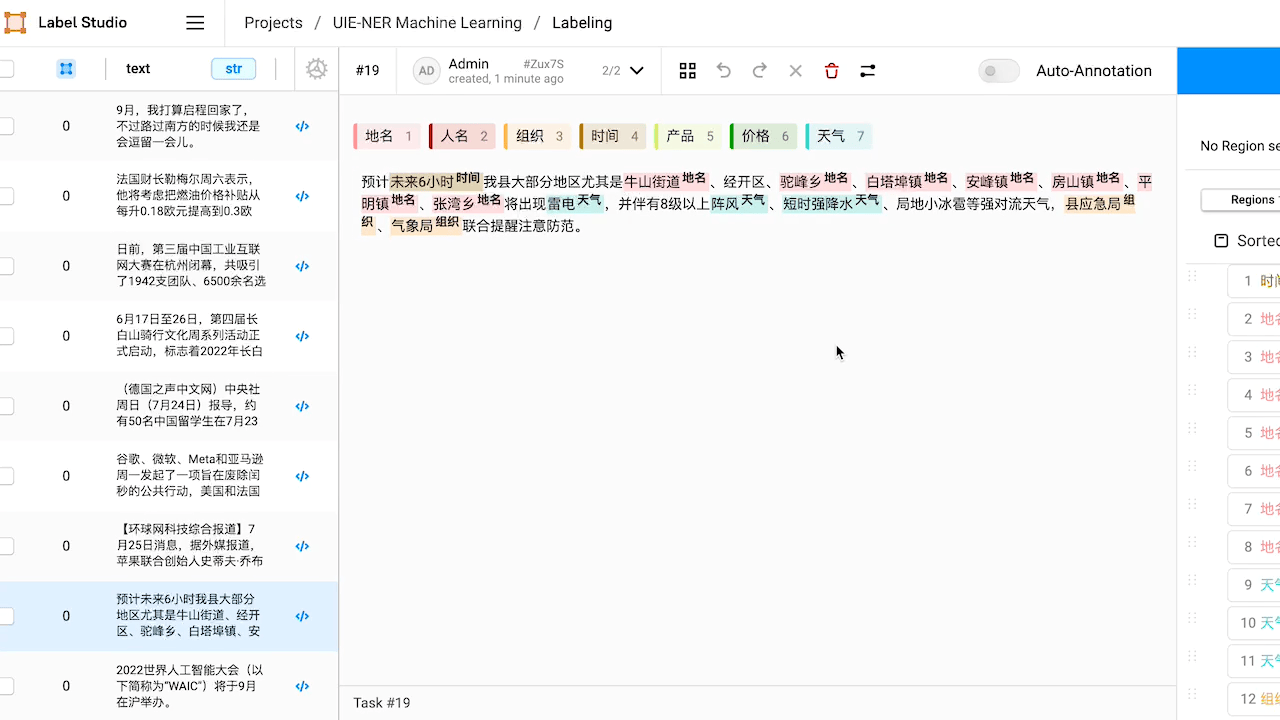
本例中,预标注的结果中「经开区」和「局地小冰雹」没有被识别出来。修改完成或预标注的结果已经符合预期,点击 Submit 提交标注结果。
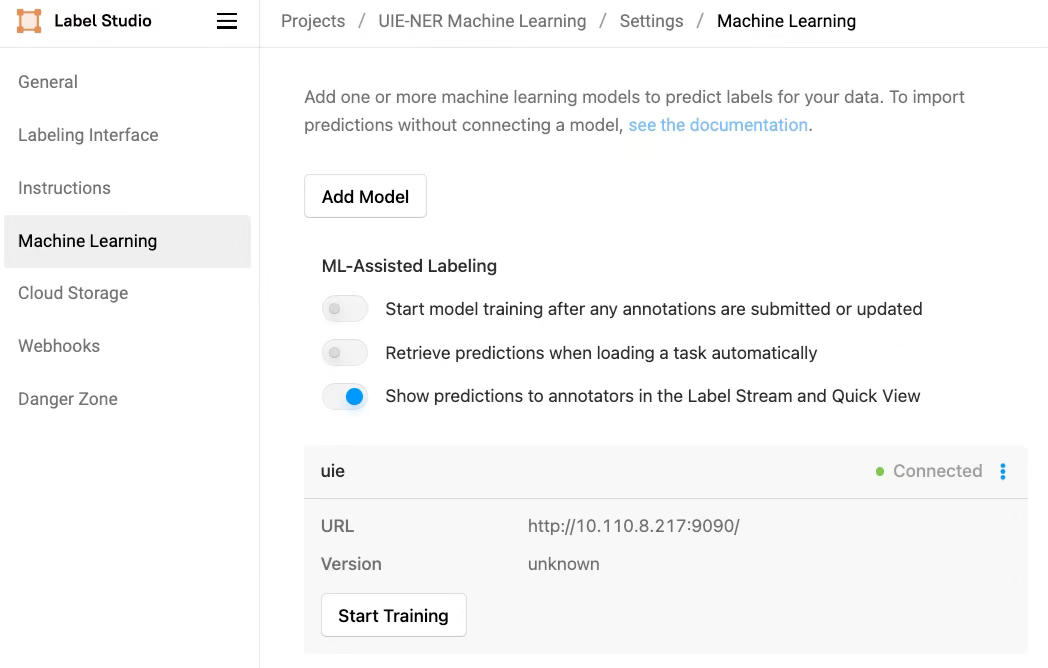
训练模型
在标注了至少一项任务之后,就可以开始训练模型了。 点击 Settings - Machine Learning - Start Training 开始训练。
然后返回启动 label-studio-ml-backend 的窗口可以看到训练的流程启动了。 除此之外,还可以 使用 API 训练模型 或 使用 webhooks 触发训练。
总结
- Label Studio 所提供的 Machine Learning Backend 提供了一个比较灵活的辅助人工标注的框架,我们通过它确实可以加快 nlp 数据的标注
- Label Studio 的 enterprise 版本提供了 Active Learning 的流程,不过从其描述看这个流程并不完美,尤其是
fit部分,由于 Label Studio 低估了「Train」所花费的时间,所以每次标注都自动训练的流程可能并不会那么顺滑 - 我们并没有使用 Label Studio 所提供的「Auto-Annotation」的功能,因为它存在重复标注的问题
- 既然 Label Studio 提供了它的 api 那其实可玩的东西还是很多的,配合 webhook 等内容可能会让这个标注和训练的流程做的更加高效